Step-by-Step Guide
How to Record Lectures (and Actually Use the Recording)
Learning how to record lectures is the easy part. The hard part is doing something with an hour of audio afterward. This guide covers your school's recording rules, setup, recording on iPhone, Mac and Windows, and how StudiGEMS turns the recording into notes you'll actually study from.
📖 What You'll Learn in This Guide:
🎧 Why Recording Alone Isn't Enough
Recording a lecture means you don't have to type every word. You can actually listen. That part works.
The problem comes later. Re-listening to a full lecture takes as long as the lecture did, so most recordings never get played again. A recording is raw material, not study material.
The fix is to turn the recording into notes right away. An AI note taker for lectures does that for you: summary, key terms and definitions, saved under the course.
⚖️ Check Your School's Recording Rules First
Before you learn how to record lectures in class, find out whether you're allowed to. Rules differ by school, by instructor and sometimes by state.
Ask your instructor
Check the syllabus for a recording policy. If it doesn't say, ask before the first lecture you record. Asking first avoids problems later.
Use disability accommodations if you need them
If you need lecture recordings because of a disability, contact your campus disability services office. Recording can be approved as an accommodation, and the office can coordinate it with your instructors.
Know your state's rules (example: Florida HB 233)
Some states set rules of their own. In Florida, HB 233 lets students at public colleges and universities record class lectures for their own educational use, but restricts publishing those recordings. Other states differ.
Not Legal Advice
This is general guidance, not legal advice. Check your own syllabus and your school's recording policy before you record. And whatever the rules, keep recordings for your own studying. Don't post or share them.
🎙️ Recording Setup Tips
A clear recording makes a better transcript. A few minutes of setup before class goes a long way.
Sit close to the speaker
Near the front, and away from the projector fan, the door and anyone who talks through class. The closer you are, the clearer the recording.
Start with a full battery
A long lecture plus a screen that stays on adds up. Charge before class or sit near an outlet.
Check your storage
If you're recording to a voice memo app, make sure your phone or laptop has free space before you hit record.
Place the mic well
Point the phone's mic toward the instructor, face up on the desk. Keep it off your laptop keyboard so typing doesn't drown out the lecture.
What if the recording gets interrupted?
With StudiGEMS, your transcript is backed up as you record. If your browser closes, your laptop shuts or the Wi-Fi drops, the lecture isn't lost: the transcript is kept, and you can still summarize it once you're back online. Students asked for this, so we built it.
📱 How to Record a Lecture on iPhone
You have two options, and neither needs a new app.
Voice Memos (built in)
Open Voice Memos, tap the red record button when the lecture starts, and tap it again to stop. You get an audio file you can upload to StudiGEMS later to turn into notes.
Straight into StudiGEMS in your browser
Open StudiGEMS in Safari or Chrome, pick the course, and tap record. Allow microphone access when the browser asks. The recording goes straight into your course, with no upload step afterward.
💻 How to Record Lectures on Mac
Voice Memos or QuickTime Player
Voice Memos works the same way as on iPhone. In QuickTime Player, choose File > New Audio Recording and click the record button. Either one saves a file you can upload later.
Or record in StudiGEMS
Open StudiGEMS in your browser, pick the course and click record. Allow microphone access when prompted.
🖥️ How to Record a Lecture on a Windows Laptop
Sound Recorder (built in)
Search the Start menu for Sound Recorder (called Voice Recorder on older versions of Windows) and click record. It saves an audio file you can upload later.
Or record in StudiGEMS
Open StudiGEMS in your browser, pick the course and click record. Allow microphone access when prompted. Keep the laptop's mic pointed toward the front, not buried behind the screen.
✨ Turn the Recording Into Notes With StudiGEMS
This is how to take notes with AI instead of by hand. Record live in the browser or upload a recording you already have, and StudiGEMS transcribes the lecture and turns it into notes. New users get 30 free minutes of note-taking.
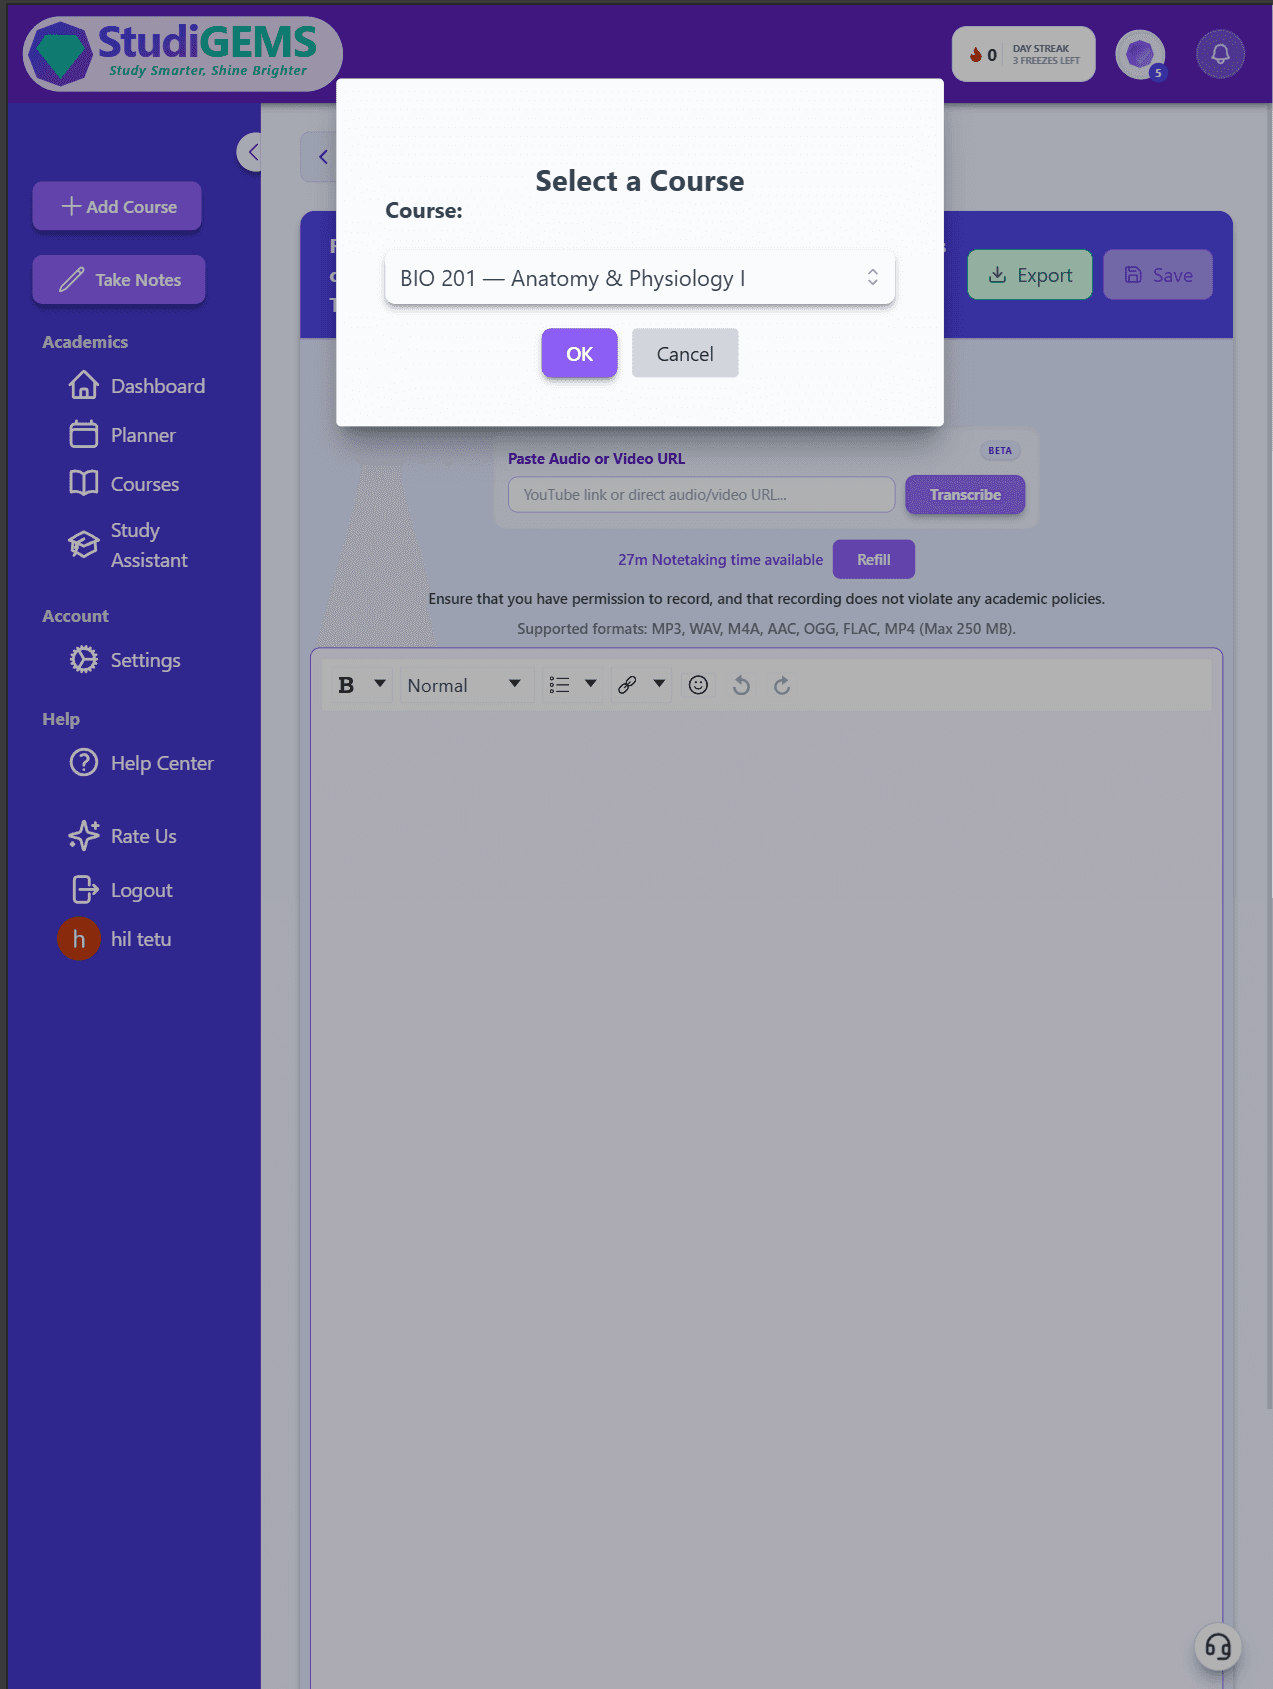
Pick the course
In StudiGEMS, click Take Notes in the left sidebar and choose the course the lecture belongs to. Your notes are saved there automatically.
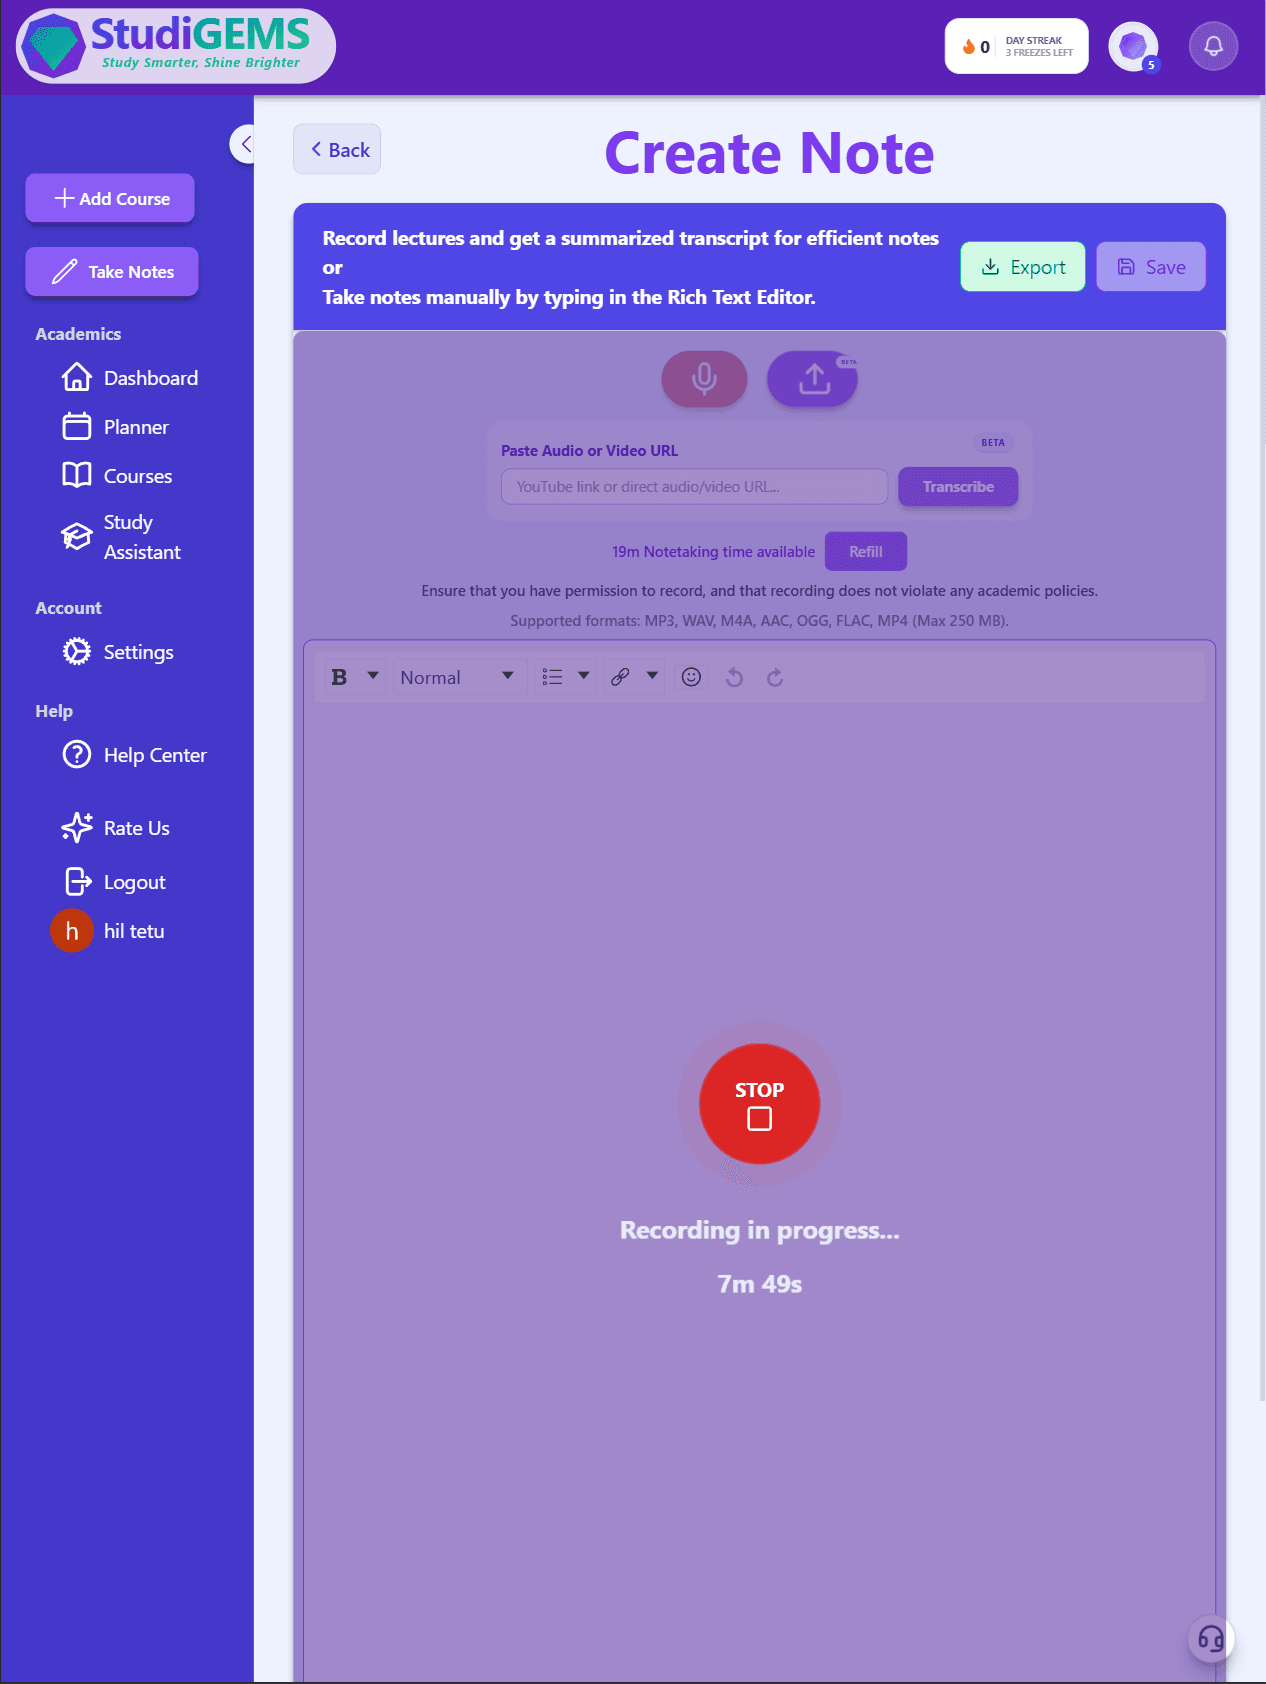
Record live, or upload a recording
To record live, click record and allow microphone access when your browser asks. On a phone, this works in the browser, with no app to install. Already recorded the lecture? Upload the file or paste a link to it instead. A pasted link must be a direct download link to the audio or video file, not a page that plays it, or transcription will fail. YouTube links are the exception and work as-is.
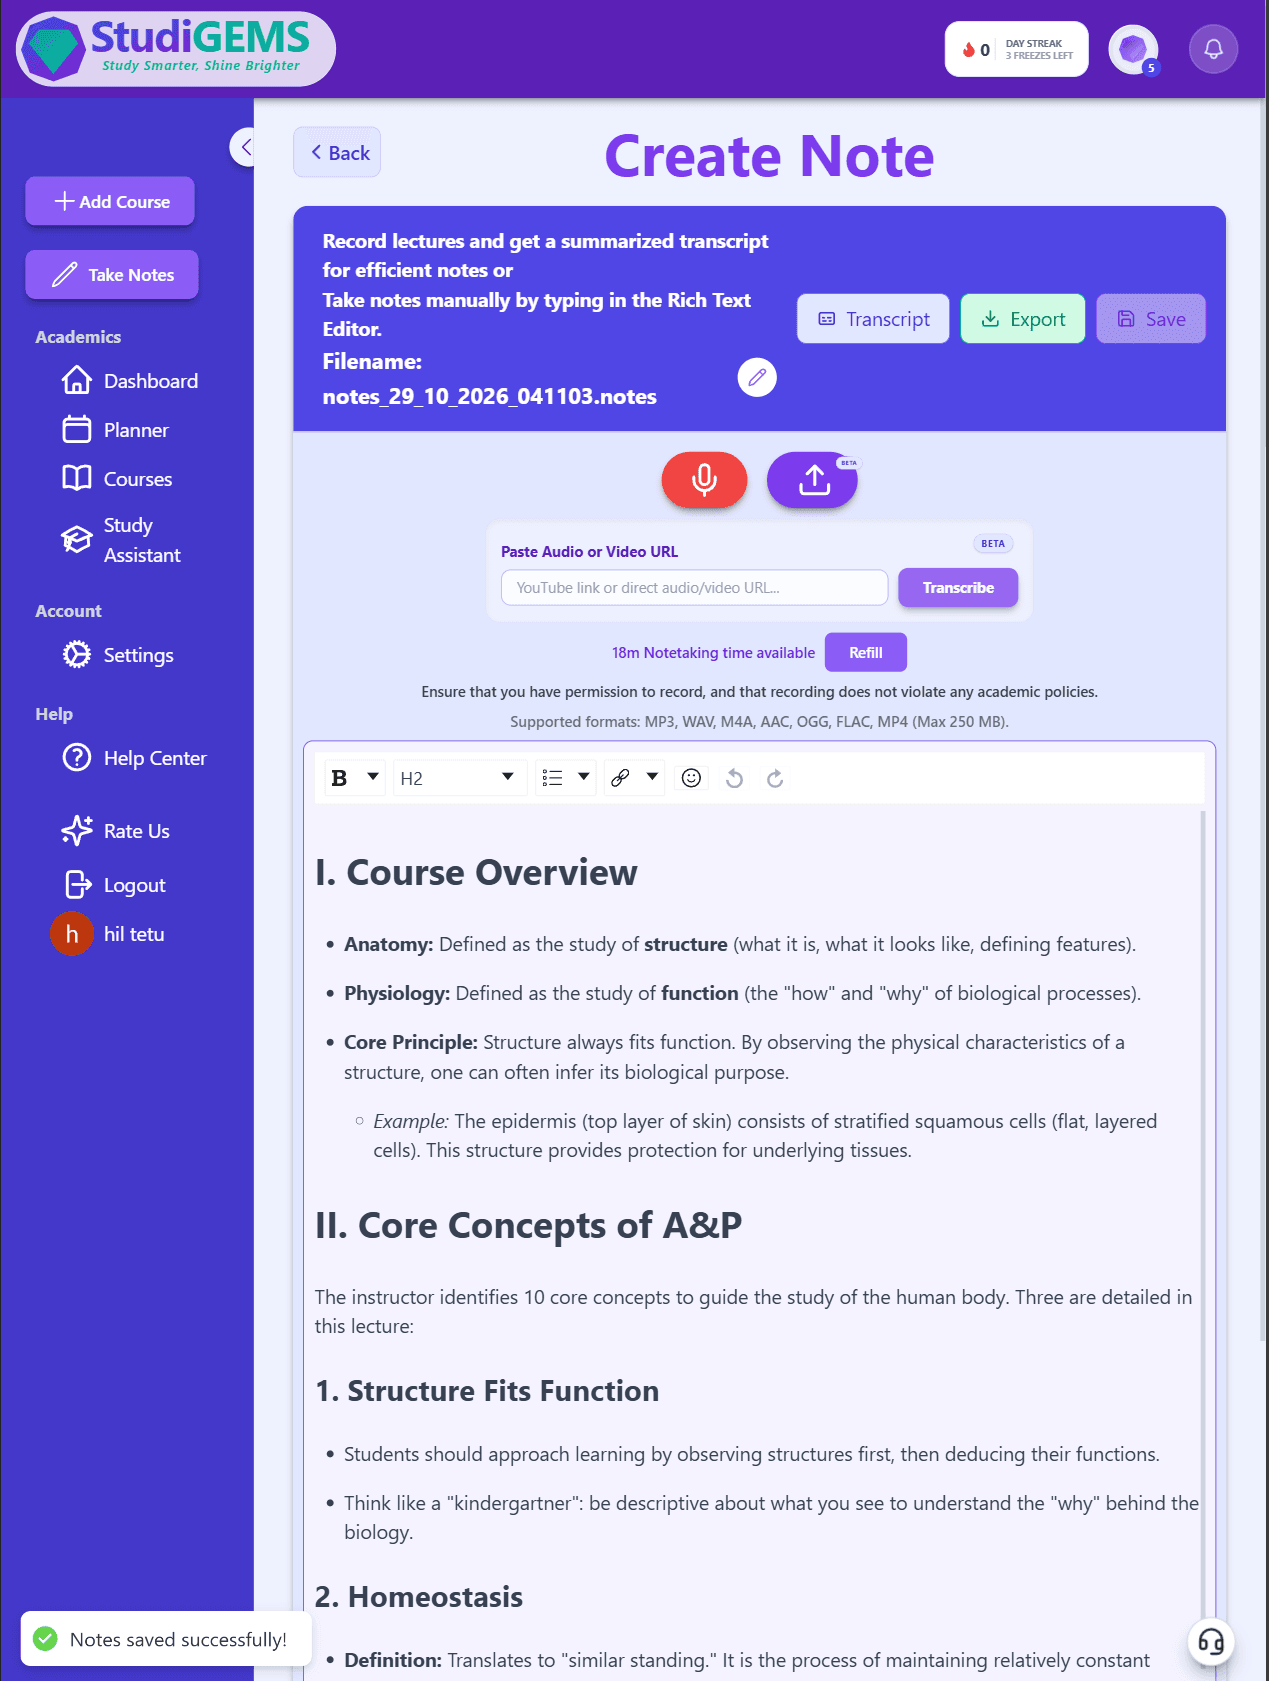
Stop and get your notes
When the lecture ends, stop recording. StudiGEMS turns the transcript into organized notes: a summary, key terms and definitions.
Comparing note-taking apps? See how the best AI note taking apps for students stack up.
Record Your Next Lecture
Start with 30 free minutes of note-taking. No credit card required.
🃏 After the Notes: Flashcards, Quiz, Study Guide
Notes are for review. Testing yourself is what makes the material stick. Once your lecture notes are in StudiGEMS, the same course can take you the rest of the way:
- Flashcards: Generate a deck from your notes in a few simple clicks, for the terms you need to know cold.
- Practice quiz: Turn the same notes into a multiple-choice quiz to check what you actually understood.
- Study guide: Before the exam, the AI study guide generator can turn your notes and slides into one review document.
Prefer handwritten notes? Start from a free Cornell notes template.
❓ Frequently Asked Questions
🔗 The Rest of the StudiGEMS Toolkit
Lecture notes are one piece of what makes StudiGEMS a complete academic success system. Here's what else keeps you ready for exam day:
📚 Study Guide Generator
Turn slides, PDFs or notes into a structured study guide with practice questions built in.
Explore the Study Guide Generator →📅 Syllabus to Calendar
Upload a syllabus and StudiGEMS extracts every exam and deadline, so you know which lectures to review and when.
📅 Study Plan Generator
StudiGEMS can build a session-by-session study plan around reviewing your notes, placed in the time you actually have open, with a method assigned to every session.
Explore the Study Plan Generator →💡 Conclusion: Record It, Then Use It
Check the rules, set up your phone or laptop, and hit record. Then turn the recording into notes the same day, while the lecture is still fresh, so it becomes something you study instead of a file you never open.
Record your next lecture and leave class with organized notes already in your course.
Ready to Turn Your Next Lecture Into Notes?
Record live on your phone or laptop, or upload a recording you already have. The StudiGEMS note taker turns it into a summary, key terms and definitions, saved under your course.
30 free minutes of note-taking. No credit card required.